Sunday, June 15, 2014
Quick, easy, one piece of paper folded mini-album, book or journal tutorial
I have found that the longer I wait after a vacation or special event to do a photo album, the less likely I am to do one at all. I've found as well that I enjoy a small mini-album over a big one and a few select photos over many photos. If you're like me, this is the perfect mini to whip out in a hurry with minimal supplies. It's made with one sheet of paper and its small size—7 x 10.5cm—is perfect for using up hoarded scrap pieces. It also makes a nice little journal or book.
On Wednesday of this week, my husband and I decided to enjoy the beautiful weather we've been having and spent the day in Yvoire, a medieval village on Lake Leman not far from our home. Yvoire is over 700 years old and is officially listed as one of France's prettiest villages. It is also recognized as a Village Fleuri, a special designation given to French villages that are beautifully planted in flowers. Everywhere you look in Yvoire there are roses growing on the walls, over the doors, flowers spilling out of planter boxes; it truly is a lovely village.
Tutorial
Basic supplies—one American 8 1/2 x 11 sheet of paper or European A4 and...that's it! Well, it might help if you have a bone folder, but it's not a must.
Step 1—fold your sheet of paper in half lengthwise (with the patterned side you want showing out) and open it back up.
Step 2—now fold it in half widthwise, this time keep it closed.
Step 3—fold the left edge to the right, back to the the previous fold. Turn it over and fold the right edge to the left.
Step 4—now you will have a type of accordion looking fold. Your patterned side should be inside at this point.
Step 5—open up the sheet of paper. You will see that the paper has been folded into eight rectangles. In the very middle fold, you will cut a slit two rectangles in length (where the dotted line is in the photo).
Step 6—turn the paper over, pattern side up.
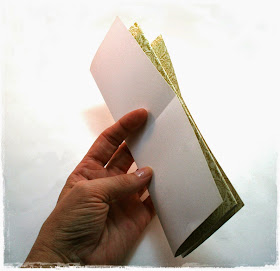
Step 7—fold the paper lengthwise again. Take the right and left edges and push towards each other.
Step 8—you will see you have a plus sign + shape.
Step 9—to form your pages fold the top of the plus + sign to the right, fold the edge in your left hand to the right.
Step 10—and voila! Your mini is ready to decorate.
Once the album has been folded, you can easily see where you might want to add a little adhesive to keep it closed, or where the edges need to be trimmed a little bit.
I think this little album is perfect for Gloria's Craft Hoarder's Anonymous challenge #9 "Fold it!" so I'm linking it up. As always, there's a great prize up for grabs and you've still got 'til midnight Sunday American Pacific Standard Time to "Fold it!" and play along.
Materials
Paper—The Paper Studio Antiquity paper pack, kraft cardstock, Ratana journaling tags
Ink—Distress Old Paper
Images—vintage roses courtesy of Flow magazine (English version) issue #4
Punches—Fiskars border punch
Embellishments—metal corners, pearls, ribbon, washi tape


Wow, what a beautiful mini album, love all the details. Thanks for the tutorial! Thanks for playing along with us at Craft Hoarders Anonymous!
ReplyDeletelove this mini!! Thanks so much for sharing with us at Craft Hoarders!!
ReplyDeleteShani,
ReplyDeleteThis is adorable! Thanks for the pictorial. I will definitely be making one.
Hugs, Lisa
p.s. I'm with you, I prefer mini albums over large albums (too overwhelming to complete!).
Fantastic! I can't wait to use your tutorial and make my own album :)
ReplyDeleteThanks for sharing with us at Craft Hoarders Anon!
What a wonderful, wonderful project! I absolutely love it...and I will probably "lift" this idea as it is so fun! (I'll link back to your blog, of course!) The finished mini is wonderful, and I love how approachable the project is, too! Thanks so much for joining the fun at Craft Hoarders Anonymous Challenge #9: Fold it!
ReplyDeletesimple, yet elegant. Thank you for the tutorial too! I love this idea!
ReplyDeleteShani très beau ce pas à pas pour garder les souvernirs de ce magnifique village! Très beau ton mini! Merci pour l'explication!
ReplyDeleteOh what a CHARMING tiny little album! This is too cute for words, and who wouldn't want to carry this little piece of art everywhere! Thank you for the wonderful tutorial, you make it look very easy! And thank you for sharing the bit about your day, too - sounds like a wonderful little village! Hugs!
ReplyDeleteWhat a great mini album! Thanks so much for the tutorial...this is something that I would try. Thanks for playing along with us at Craft Hoarders Anonymous!
ReplyDeleteThis fold is cool beans! Love it!!Thanks for playing along with the Craft Hoarders Anonymous!!
ReplyDeleteThis is over the top amazing! I love how you decorated this one! Perfect!
ReplyDeleteThanks for the tutorial. I want to make one! Thanks for playing along with us at Craft Hoarders Anonymous!
wow wow wow!!!! girl this is stunning!!!
ReplyDeletemight have to give this one a try :)
What a wonderful little photo book - you're right - it's the perfect size to hold memories of a small journey! thanks for the tutorial!
ReplyDeleteGreat take on the challenge! Thanks for playing along with us at Craft Hoarders Anonymous Challenge Blog!
ReplyDeleteGreat idea! Must try it!
ReplyDelete